METAL LAMİNASYON TEKNİKLERİ
VE
TASARIMA KATKILARI
LAMİNASYON TEKNİKLERİ ve MOKUME GANE
Laminasyon : Tabakalandırma, tabaka tabaka yüzey oluşturma anlamlarına gelmektedir. Dünyada tekstil,ayakkabı ve ahşap dizayn sektörlerinde kullanılmaktadır. Takıda kullanım alanı ise ahşap görünümlü metaller oluşturulmaktadır. Ayrıca takıda birden çok metal kullanılması sebebiyle çok renkli görünümler elde edilebilmektedir.
Mokume gane tekniği sadece takıda kullanılmamaktadır. Çeşitli aksesuarlar ve endüstriyel ürünlerde kullanılmaktadır. Saat, çakı, bıçak, kupa gibi.
OTOİNŞA TEKNOLOJİSİNDE LAMİNASYON

Bu teknolojide katmanlar, (istenen inşa hassasiyetine ve hızına bağlı olarak) yeterince ince tabakalar halinde olan katı haldeki bir malzeme ile inşa edilir. Tabaka halindeki bu malzemenin çeperlerinin gerektiği gibi kesilmesi ve bir önceki katmana yapıştırılmasındaki sıralamaya bağlı olarak ise iki farklı gruplandırma yapılabilir: Bonding + Cutting tekniğinde, her tabaka, bir önce fabricated olan katmana yapıştırdıktan sonra çeperleri kesilir. Cutting + Bonding tekniğinde ise, tabakalar önce gerektiği gibi çeperlerinden kesilir ve sonra da, bir önceki katmana yapıştırılır. Yapıştırma için genellikle katmanlar arasında farklı bir yapıştırıcı malzeme kullanılır.
Bonding + Cutting tekniğinde, kullanılmayan malzeme inşa sırasında destek rölü üstlenir fakat inşa sonrasında ayırmak güç olmasın diye inşa sırasında bu kısımların küçük parçalara bölünmesi gerekir. Cutting + Bonding tekniği ise destekleme için, ayırması kolay, farklı malzemeler kullanmaya daha müsaittir.
Tabaka malzemesi olarak, kağıt, plastik, köpük, metal kullanılabileceği gibi, sintering sonrası tam yoğunluk elde edilebilecek, seramik veya metal tozu emdirilmiş malzemeler de kullanılabilir.
CAM-LEM Ekim 1994 tarihinde USA Ordusu'ndan aldığı maddi destekle kurulmuş ve ArGe çalışmalarını Case Western Reserve University ve diğer bazı üniversite ve araştırma kuruluşlarıyla ortak yapmıştır. CAM-LEM, "Computer-Aided Manufacturing of Laminated Engineering Materials" yani "tabaka halindeki mühendislik malzemelerinin bilgisayar destekli imalatı" anlamına gelmektedir. Case Western Reserve Üniv.'sinden Dr. Arthur H. Heuer, Dr. James D. Cawley ve Dr. Wyatt S. Newman CAM-LEM prosesini tasarlamış ve patent için başvurmuşlardır. Aynı kişiler CAM-LEM firmasının kurucu ve yöneticileridir. CAM-LEM, geliştirdiği autofabrication cihazını kullanarak Şubat 2000'den itibaren seramik ve metal parça imalat hizmetleri vermeye başlamıştır.
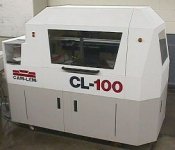 CL-100 modeli autofabrication cihazı 150x150x150mm inşa hacmine sahiptir. CL-100 makinesi tek bir otomatik inşa çevriminde 5 farklı tip (kimyasal özellik veya kalınlık olarak) malzemeyi kullanabilir. Destek yapısı olarak ise sintering sırasında yanarak bünyeden atılabilen "fugitive" malzemeler kullanılır. Bu sayede inşa edilen parçalarda iç boşluklar ve kanallar oluşturulabilir. İnşa sırasında 0.1-0.6 mm veya daha kalın katmanlar kullanılır. Sintering sırasında, malzemeye göre %12-18 arasında değişen çekmeyi kompanse edecek şekilde parçalar biraz büyük şekilde inşa edilir.
CAM-LEM Projesi:
|
|
|
|
1- Lazer ile, bilgisayar kontrollü olarak seramik veya metal toz karışımlı ham katmanlar kesilir.
|
2- Kesilen katmanlar vakumlu robotik manipulatörlerle otomatik olarak üst üste eklenir. Aynı katmanda birden çok farklı malzeme kullanılabilir. Destek amacıyla sintering sırasında yanabilen uçucu (fugitive) malzemeler kullanılır.
|
|
|
|
|
|
3- "Green state" ismi verilen pişmemiş haldeki ham parçaya sıcak ortamda basınç uygulanarak katmanlar arası yapışma sağlanır. Buna "lamination" ismi verilir.
|
4- Parça, sıcaklık kontrollü bir fırında tam yoğunluk ve monolitik bir yapıya erişinceye kadar sinterlenir. Bu esnada %12-18 çekme olur.
|
5- Sintering sonrası parça %100 yoğunluğa ve yüksek mukavemete erişir.
|
MOKUME GANE
Yaklaşık olarak üç dürt yüzyıl önce Japonya`da geliştirilmiş bir metal işleme tekniği olan Mokume gane iki ya da daha fazla metal tabakanın sürekli birleştirilip ardı ardına şekillenmesiyle oluşan tabakalar yığınıdır.Geleneksel Japon tekniği tabakaları mangal kömürüyle kaynak yaparak yayılım yoluyla birleştirmeyi başardı.
Bu lamine edilmiş yaprak maddeler kesik bükülmüş ve dövülmüş lamine kombinasyonu ile değişik renkli alaşımlar yaptı çeşitli tabakalar meydana çıkardı.Model tasarlandıktan sonra şekillendirilmiş tamamlandırılmış esere standart metal dövme işlemi ve fabrikasyon teknikler uygulanır.
Mokume gane ismi metal modelin ağaca yakın görünüşünü görselliğini anlatan tavrı sebebi ile verilmiştir.
Bu etki birçok metalin bir araya gelmesiyle olur. Metaller sandviç gibi üst üste gelir. Yüzeyde değişik renkler oluşur. Farklı renkteki metalleri yüzeyde teşhir eder. 5 tabakaya kadar renkli metaller birbirine lehimlenir. Kullanabileceğimiz metal kombinasyonlar nikel, gümüş, bakır, pirinç, monal metal(para ve jeton yapımında kullanılan metal) standart gümüş (925) has gümüş ve beyaz, kırmızı, sarı altındır. Metal tabakalarının kalınlığı birbirine yakın olmalıdır. Yaklaşık 1/48 inch (500 micron) maliyetinden dolayı her ne kadar altın ince kullanılsa da metaller aynı kalınlıkta olmalıdır. Eğer orijinal tabaka aşırı derecede ince ise altın sadece ince bir çizgi halinde görülür.
Tabakalar birbirine kaynatıldıktan sonra silindirden geçirilir. Kalınlığı 1/32 inch (800 micron) civarına indirilir. Bu işlem sırasında metal ısıya ihtiyaç duyar. Tabaka iki eşit parçaya bölünür. Bir yarısı diğerini üstüne yerleştirilir. Bu iki parçada lehimle tutturulur bu işlemler (lehimleme ve kesme) arzu ettiğimiz kadar tekrar edilir. Çünkü her seferinde katmanların sayısı ikiye katlanır.
Bir yarısı diğerine lehimle birleştirildikten sonra parça metal seçkin olması için aside atılır. Yıkanır, tamamen durulanır ve kurulanır. Arka yüzeyinde çalışılır ya da önde rasgele yapılma çizikler veya düzgün örnekler yüzeye çalışılır. Bir dizi çeşitli aletlerle (freze veya eğeyle) malzemenin ön yüzeyinde farklı etkiler yaratılabilir. Esnek freze uçları, çelik kalem, delgi (zımba) ve başlıcaları. İstediğimiz derinlikte kullanabiliriz. Desenleri çizdikten sonra metal tavlanır, düz oluncaya kadar silindirden çekilir. Tekrar tavlanır; bu aşamada aside atılır. Her ne kadar ideal olanı soda artı su karışımında kaynatmak daha sonra durulamak olsa da aside atabiliriz.
Bütün bu işlemler yapıldıktan sonra parça kullanıma hazırdır. Bu parça başka bir metale yumuşak lehimle kaynatılabilir. Üzerine veya içine lehimlenebilir. Yaptığımız çalışmaya renk etkisi vermek için kullanılan metal karışımına bağlı olarak ciladan sonra standart gümüşün oksitlenmesine izin verebilirsiniz.
Metale sadece sıradan yani beyaz, yeşil, sarı ve kırmızı renklerin dışında çeşitli alaşımlar hazırlayarak ta renk verebiliriz. Bu aşlımlar ve fiziksel özellikleri aşağıda verilmiştir.
Mokume Gane’nin tam olarak anlamı budak görünümlü metal olarak çevrilir.
Mokume gane yapılırken ustalar kaynak için çeşitli alaşımlar seçer.
Metalin en kayda değer özelliği renkli ve dövülgen oluşudur.Renk faktörleri sadece metalin doğal renk hacmini kapsamaz birde kimyasal ajan başvurularıyla gerçekleştirilebilir.Yapılmış maddenin oluş miktarına model isteğine bağlı olarak etrafı folyo ile çevrilmiş katman içinde hazırlanmış yaprak levhalar hazırlanır.
Feodal Japonya’dan Günümüze
Feodal Japonya’da dekoratif metal (mokume gane) çalışmanın temel sahalarından biri kılıçtır. Dekoratif tekniğin sembolik buluşu, Akita bölgesinde bir demirci ustası olan Denbei Shaomi (1651-1728)dir.
Shaomi’nin birinci parçası bakır tabakadan oluşur ve shakudo (%4’ya da %2.5 bakıra saf altın içeren bir Japon bakır alaşımıdır) lamine edilmiştir.
Çin ve Japon vernik çalışmasına benzeyen efekt quri-bori kalın paralel tabakaların derin, kırmızı ve siyah verniklenmesi önemli bir gelişmedir.
Shaomi yavaş yavaş yatsılaştırarak laminasyon kümelerin yüzeyinde yer alan ağaç-zerre modeller meydana getirmeyi öğrendi.
Shoami geleneksel metal dövme işlemine kaynak yapma teklerine başvurarak demir olmayan metalleri kullanıp dekore etti ve kılıcı tamamladı.
Birçok demir ve demir olmayan mokume gane tsuba ve diğer ortaya konulan fikstür modeller geliştirilen kılıç ağzı modelleriyle benzerlik gösteriyor. Tekniğini diğer ustalarla paylaşmaya geçti.
Bugün dünyada hala mokume gane Tsubanın birkaç güzel örneği ve ahşap görünümlü kılıç vardır.
1893 Martı’nda Prof. W.C.R Austin Toplum ve Sanat konferansında, İngiliz Kraliyet Ailesi Koleksiyonunda böyle bir nesneyi , bir vazoyu tanımladı. Vazonun gövdesi mizu-nogoshi (mermer model gibi) birbirini izleyen tabakalardan ,kırmızı bakırdan (shoku-do) oluşuyordu.
Yapımının çok zor olması sebebiyle mokume gane geniş çapta sık kullanılan bir teknik olmadı.
Baştan sona, mokume gane nesnelerinin büyük bir sayıda üretileni yoktu, muhteşem metal nesnelerin, 1800'de Avrupa ve Kuzey Amerika'ya ihraç edildi.
1866’da bu parçalar bilginlerin ilgisini çekti. Robert Austin gibi ve Rafhael Rumplly ki o belki de ilk kez İngiliz dilinde metotların tanımlamasını yazan kişidir.
Mokume ganenin ilk modern analizleri : difüzyon tekniğini kullanarak kaynak yaptığını, lehim yapmadıklarını gösterdi. Mokume gane üretiminde lehim kullanmak hemen hemen imkansız. Herhangi bir nesne parçanın yapımı maddenin bileşimini önemli derece bozar.
Bu uygun oranlı kırılgan olmayan lehim alaşım, şekillendirme boyunca delaminasyon (tabakalar halinde dizilim) lehimle birleşir.
Bu zorluk batılı ustaları bazı iş oluşumlarını bu teknikle engellemedi. Sonunda iki batılı usta 1800lü yılların sonunda 1900lü yılların başında mokume gane tekniğini kullanarak iş yaptılar. Her ikisi de, Japon ustaların benzersiz teknik ve stillerinden etkilendiler.
İngiltere ,Lenceshire , preston Belediye Başkanı için ofisin zincir bağlantı merkezinde mokume ganeyi kullanan Sir Alfred Gilbert o iki kişiden biridir. Diğeri 1870lerde Lois Comfort Tiffany’nin baş tasarımcısı Edward C. Moore’dur.
1982 kışında bir atölye yöneticisi SIUC ‘de (Southern Illinois Universty at Carbondale) , akademik sanat eğitmenleriyle teknik bilgiyi yayma, niyetiyle metal sanat ustalarına mokume gane öğretisi düzenledi.
Kuyumcu ustası olan Steve M. Tekniği anlamak ve ilgi ve yardım sağlamak için iki kitap ve bir eğitici video yayınladı.
Pijanowski laminasyon metodunu kaynak yapılmış sıvı bir difüzyon olarak tanımlar.
İngiltere’de Sheffield’ ta bıçakçı olan Boulsever çalışırken elinde olmadan bakırın gümüşe doğru damladığını keşfeder.1743 te difüzyonla gümüşten bakır alaşımlara kaynak yapmayı keşfetti.
Metalin silindirle düzlendiğinde uyum içinde keşfetti.Sheffield in bulduğu bu buluş laminasyon tekniği olan ve Japonların mokume gane ye çok benziyordu.
Mokume gane 20. yy ilk yarısında batıda hemen hemen hiç bilinmiyordu. Sadece bilim adamaları , Dr. Cyril Stanley Smith , Herbert Maryon gibi müze personeli, küçük bir sınıf koleksiyoncu Japon metal işinin farkındaydı. Japonya da bile yakından bilinmiyordu. Modern Japon akımı geleneksel el sanatlarından uzak ve zanaatkarların üretimde tekrarladıkları küçük elsanatları tamamen kaybolmuş. C S Smith antika kılıç ağızlarını ve fikstürleri analiz etti.
1960ların başlarında Prf. L Brent Kington ve bir grup mezun öğrencisi deney ve araştırma kursuna katıldı.
Bu metal sanatını akademik sanat halkasına doğru incelemeyi başlattı. Asyalı Müslüman ve Avrupalı metal kılıçlar gösterişli model araştırmasını devam ettirdi. Bu araştırma doğal olarak müze koleksiyonundaki mokume ganede bulunan maddeyi deneysel kopyalama girişimine yol açtı. Bir dökme metalin içinde, katının lehimlemeden daldırmaya birçok metodu denenmiştir.
Geleneksel Japon metal teknikleriyle ilgilenen eğitmen ve metal ustaları Hiroko Sato ve Gene P. 1970’te Japon‘yayı ziyaret ettiklerinde bir mokume gane gördüler. Tokyo’da bir dükkanda Mitsukashi departmanında geleneksel sanat sergilerini gördüler. Orda da mokume gane tekniğiyle G.S. tarafından yapılmış kase gördüler.
1977 baharında Pijanowski; SIUC (Southern Illinois Universty at Carbondale) tarafından konferans, seminer ve ziyaret için bir hafta sonu davet edilir. Japon alaşımları ve metotları hakkında bilgilerini paylaştılar.
Eğimli plaka iki ılımlı çelikten oluşur. Yaklaşık olarak 0.5 inchin ¼ kalınlığında ,etrafı matkapla delinmiş, 4/6 cıvata deliklerinden geçirilip sıkıştırılmış veya eğimli yaprakların üstünde laminasyon boyunca büyük basınç sağlayan ağır demir tel Tomagawa ve Pijanowski tarafından kullanıldı. Bu temas basıncı çoğaltır veya azaltır o zaman yaprak hazırlığı geçikir.
Artık onlar kusursuz yassı zemine gereksinim duyuyorlardı. Cıvatalar sıkıştırıldığından beri yaprakların yassılığında küçük düzensizlikler çıkardı. Bu buluş laminasyon oluşumunda başarı oranını büyük ölçüde geliştirdi.
Kullanılan belirli tekniğe bağlı olarak ; birleşme bir katı durum, difüzyon kaynak birleşmesi olabilir. Geçici bir likit safha difüzyon kaynak birleşmesi olabilir ya da lamine edilmiş çelik plaka içine yalnız yaprakların bir likit difüzyonun kaynakla birleşmesi olabilir.
Mekanik ve kimyasal temizlemeden sonra metal yapraklar (mokume yapmada kullanılacak olan) üst üste sıralanır ve bağlanır.
Sıralanmış yığın bir ocağa ve hararete koyulur metal yığın buğulanana kadar. Bu noktada yığındaki bazı alaşımlar sıcaklığa ulaşınca yığının kenarında bazı sıvı haller gözlemlenebilir. Yığın hızlı ve dikkatlice ocaktan kaldırılır.
Daha sonra ısı yavaşça düşürülür. Laminasyon oluşumu kömür,kok kömürü yada mangal kömürü ateşi demir ocağı ya da gaz ocağı ateşi uygulayarak sağlanabilir.
Mokume ganede kullanılan metalde oksijen genellikle hazır bulunur, gelişmiş oksit tabaka kaynak difüzyonu tutar. Ocak gibi ısınmış bir çevrede onlar hızla büyür. Yığınlaşmış tabakaların içinden geçerek birleşmenin tamamlanmasına engel teşkil eder. Bu sebeple yığının etrafındaki oksijenli ortamı azalmak gerekir.
MOKUME GANE- SHAKUDO- SHIBUICHI- SHIRO SHIBUICHI
It begins with an historical introduction of mokume gane. You are brought into its world of development and introduced to its masters — from medieval to contemporary times, from one global hemisphere to the other. Even if you are not a follower of historic details, they are presented so well in this book that you will find yourself reading it just so you can learn more about the seductive examples of mokume gane.
Metallurgy is a serious consideration when doing mokume gane, especially when using more exotic metals. The section on metallurgy is thorough, providing the technical details without technical jargon. A chart of metal compatibility is included, which allows cross reference to metals that will be the most compatible when bonding. Besides the common metals of copper, brasses, and sterling, it includes shakudo, kuromido, silver alloys, white and colored gold alloys, shibuchi alloys, palladium, platinum alloys, and nickel.
Midgett also discusses important considerations that concern malleability and ductility when forming the billet. This area shares essential information to help you make a solid billet that will perform reliably. It’s nice to know if a billet will handle the stresses of being formed into a dimensional vessel, or if the metals will stretch at different rates, causing a problem with delamination; this will save you material and time. This section has lots of important hints about eutectic bonds, useful for any type of lamination.
In the bonding and firing section, Midgett covers different ways to perform the bonding according to the equipment you have. This section includes contributions by other masters of mokume gane. Midgett again presents his homemade mini-kiln suitable for small and home studios; Robert Coogan presents forge-fired mokume gane; James Binnion describes the electric kiln-fired version; Alistair McCollum shows us the solder-bonded type.
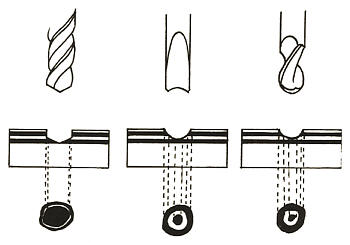
The section on patterning the mokume gane is executed very sensibly. There are side-by-side examples of the functions of various punches, gouges, and chisel patterns on a mokume gane sheet. Examples of billets before and after removing the material, and putting them through a rolling mill, clearly show the effects. It is very helpful to understand how depth, width and intersecting lines complete a pattern when an item is finally rolled. This is an integral part of developing mokume gane designs. Midgett also covers twisted patterns, hot forging, veneer, double laminations, and erosion patterning. Nicole DesChamps presents an exploration of CAD/CAM patterning mokume gane for modern applications.
Finishing is important to bring out the contrast and pattern of mokume gane. This is accomplished by etching and patination. Midgett gives formulas and helpful hints on how to bring out the details of the various metal combinations.
“The Gallery” section has contributions that should inspire you to explore this area of metal art. Astounding examples of mokume gane used in sculptural vessels and jewelry are included. You will find a rainbow of colors and a complexity of pattern and texture that surpass any two-dimensional art.
The final part of Midgett’s book consists of step-by-step projects that lead you through simple to progressively more complicated pieces. The first project uses a cast-ring base with a small strip of mokume gane inlaid for an accent. The second project is a cast ring with a mokume gane band inlaid around the entire perimeter. This one includes a nifty tip on using a hose clamp to achieve firm contact with the main casting and the inlay for sweat soldering. The third project, again a ring, uses fabrication to build an inner liner and guards on the outside of the band.
A gouge-patterned pin is the fourth project presented. Midgett demonstrates how to use a rotary tool and a bur to develop a pattern in the laminate. This is followed by forging and a subsequent round of gouging to enhance the pattern. The final project is a bangle bracelet. This bracelet has one pattern on the outside and another pattern on the inside — truly fascinating! This is accomplished by a forging method of a mokume gane end grain bar rather than by fabrication. The result is intriguing.
Whether you are a mokume gane novice or an accomplished master, this book will inspire you to stretch the limits of your creative talent and bring new life to your designs. Midgett’s tongue-in-cheek wit, attention to detail, liberal use of tips, and color photographs make this book outstanding. Introduction
"The atoms in a solid are in constant motion. These atomic vibrations coupled with vacancies in the solid allow atoms to move through the solid. The motion of matter through other matter is called diffusion. An atom may move when it attains a required activation Energy.
The diffusion process may be enhanced (helped) at higher temperatures as more energy is supplied to the solid through heat energy, thereby permitting greater atomic movement in the solid.Diffusion can also be used to bond metals together, which is the method studied in this experiment. Atoms diffused between the layers of metal and bonded them together, resulting in a single homogenous structure.
This process may be used to join similar and dissimilar metals which are amenable to by conventional welding techniques." Mayer Engel, Materials Engineering, Purdue University
Preface
We have been interested in Mokume-gane for a number of years. The only information we could find was by the soldering of different metals, cutting in half, resoldering to increase the number of layers and then exposing those laminates by punching from the reverse side and removing those embossments or by carving drilling, etching from the top. These methods have many drawbacks; namely, air pockets, cracking and peeling. Its limitations are basically that it cannot be effectively formed or raised into complex forms. During a recent trip to Japan we visited three craftsmen who practiced mokume-gane and worked with one of them. The section Diffusion By The Traditional Method is the application used by Mr. Norio Tamagawa. H.S.P. E.M.P.
The Laminates
Copper is always used as a basic metal in Mokume-gane because of in malleability and coloring possibilities. Japanese craftsmen use copper layers of 2 to 4 torn in thickness. We used 1.6 mm copper, because of its availability. The best copper we found to use is electrolytic tough pitch, alloy no. 110 because it is relatively oxygen free and can be ordered with protective covers much like acrylic sheet so that it is scratch free.
|
Metals
|
When Colored with Rokusho
|
Malting Point
|
|
|
|
|
|
 Fine Silver Fine Silver
|
White
|
9600C
|
|
Sterling Silver
|
White
|
8930C
|
|
Gold (24k)
|
Yellow
|
10630C
|
|
Shakudo
|
Black to Purplish Black
|
10500C
|
|
Shibuichi
|
Gray
|
9500C (Good Quality) 9000C (Regular Quality)
|
|
Shiro Shibuichi
|
Light Gray
|
8500C
|
|
Kure Shibuichi
|
Dark Gray
|
10400C
|
|
Kuromi-do
|
Dark Brown to almost Black
|
10700C
|
|
Copper
|
Brown
|
10840C
|
|
|
|
|
|
Shakudo
|
First Quality
|
Second Quality
|
|
|
|
|
|
Gold (24k)
|
4.8%
|
2.5%
|
|
Copper
|
95.2%
|
97.5%
|
|
|
|
|
|
|
Shibuichi
|
Shiro Shibuichi
|
Good Quality Shibuichi
|
Regular Shibuichi
|
|
|
|
|
|
|
Fine Silver
|
60%
|
40%
|
30%
|
23%
|
|
Copper
|
40%
|
60%
|
70%
|
77%
|
|
|
|
|
|
|
|
Kato Shibuichi
|
1
|
2
|
3
|
|
|
|
|
|
|
Shakudo
|
83.3%
|
71.4%
|
58.8%
|
|
Shibuichi
|
16.7%
|
28.6%
|
41.2%
|
Kuromi-do is 1% of metal arsenic and 99% of copper. It is potentially dangerous to make, but safe to use cold. When metallic arsenic is added to molten copper it will volatilize and produce poisonous gases. We are still searching for adequate safety procedures to make kuromi-do; these should employ a good ventilation system, specific vapor masks, gloves, etc. One suggestion by Professor Harold Harrison of the Physics Department of Purdue University is to melt the copper and add the arsenic wrapped in a copper foil envelope; hopefully the arsenic will disperse and mix with the molten copper before it volatilizes.
Shakudo is the most useful and easiest copper alloy to make. The procedure of alloying is as follows: anneal an appropriate graphite crucible in a gas or electric melting furnace. Add copper flux (available from Paxton/ Patterson, 5719 W. 65th St. , Chicago , Ill. 60638 ) approximately 1/8 ounce per 5 pounds. When the crucible becomes red hot add metal of the highest melting point. If using highly volatible metals, such as zinc, arsenic, lead, tin, etc., to molten copper take the precautions as noted with kuromi-do. When the copper is molten or fusion occurs cover with carbon, charcoal or any commercially available melting fluxes. Carbon excludes the air from the furnace, and also absorbs any oxygen liberated from the metals during fusion. The fused mass should be constantly agitated or stirred with a carbon rod. In the meantime, prepare the ignot mold by lightly oiling or carbonizing with a candle or dirty acteylene flame the interior surfaces of the ignot mold. Prior to pouring, the ignot mold should be preheated to approximately 100 deg. C When the new alloy is at its lowest possible liquid temperature pour into a tilted mold so that the metal flows down the side wall and does not splash; otherwise it might cause blisters or pits in the ignot. If the ignot is thick and rapidly chilled, the absorbed gases cannot escape from the interior and could cause pin holes. Remove all irregularities from the edges and surface of the ignot or later cracks could occur. Planish lightly both sides of the ignot to completely align the crystals. Anneal the ignot. Adjust the rolls with a feeler gauge (used for gaping spark plugs). When rolling use light passes. Place the ignot in the center of the rolls. After each pan through the rolls the metal can be turned over end over end, this will keep the metal flat. Anneal often. Carl Hines, a graduate student in metal at Purdue University , built the gas/air smelting furnace that we used for the alloying. See Appendix A for details of construction, etc. Diffusion by the Traditional Method
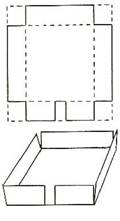
1. Materials - Some of the possible we and three metal combinations that are used in mokume-gene are copper, shakudo, kuromi do and fine silver. Mr. Norio Tamagawa usually uses eight layers of either round or square metal plates about 4 men in thickness and about 9 cm in diameter and 9 cm x 9 cm square, others use between 1 men to 4 men square sheet with the number of layers ranging from eight to twenty or more. The important thing is that the layers should be of the same thickness. Anneal and flatten. Remove all surface marks. Prepare a rusted mild steel box to contain the layers as illustrated in Fig. 1.
|
|
|
Figure 1
|
Mr. Tamagawa uses a thick slug of copper approximately 1/3 the total thickness of the layers as a back-up that will become the inside of his raised forms. Also prepare a piece of mild steel the same dimensions as the copper back-up, this will act as a weight; this should also be rusted. Do not touch the surfaces that are now scratch free. Chemically clean in a solution of 5 grams of potassium cyanide and 1.8 liters of water. Wear surgical, acid proof gloves. Rinse in water and dry with a lint-free cloth or paper towel. A standard acid pickle can also be used. Dry on an electric hot plate. Gas stoves are not recommended because the metal might sweat during the drying operation. Brush away any dust if necessary. Stack the metal in one of the possible combinations listed:
copper, shakudo, copper, shakudo, copper .....
copper, fine silver, shakudo, fine silver, copper, fine silver, shakudo …..
copper, kuromi-do, copper, kuromi-do .....
copper, fine silver, kuromi-do, fine silver, kuromi-do, fine silver .....
Place the lower melting metals between the higher metals in the sequence desired into the mild steel box. Next place the thick iron plate of mild steel on top as a weight and using thick iron wire bind the layers together as shown in Fiq. 2.
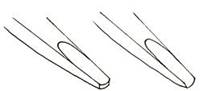
The box containing the laminates are put into a hot forge that is started with a low sulphur content metallurgical coal with hard wood charcoal added to produce a reduction atmosphere. The box of stacked metals is heated to the point where the edges start to sweat (about 900 deg. C) removed and lightly tapped with a wooden hammer. If the copper and copper alloys seemed to be diffused; rapidly remove the binding wire and hot forge. If the stack contains fine silver, wait until the mass loses its red color and then forge. Reduce by forging to about 7 men or 5 mm. Annealing after every course of forging. The Pattern is produced by using a chisel called hatsuri-tagane. The following is the procedure in making the chisel and could be applied to most metal carving tools. [1] Use a piece of water hardened too[ steel about 10 cm to 12 cm in length by about 1cm square. [2] Bring one end to bright red and hot forge to the shape of square ended spoon or wood gouge (see Fig. 3) and let air cool. [3] Place the too] steel or nail blank in ring clamp, or small hand vise, brace it against a bench pin and begin to rough out the basic shape. [4] After the rough filing, switch to a medium no 2 cut file refining the basic angles and shape of the chisel. Take a coarse emery or wet/dry silicon carbide paper, mounted on a sanding stick. and remove all file marks. [5] Harden the chisel by heating the last 112" of the cutting edge to a cherry red and plunge into cold water. To insure rapid cooling it must be moved in the water to break the insulation of the steam blanket that otherwise will form around it. It will become glass hard. To test the hardness, run a file lightly over the portion hardened; if it skips and does not cut this means the chisel is as hard or harder than the file. [6] Temper by using a flame concentrated about 1/3 of the length above the cutting edge. Watch closely as the color marches or moves toward the tip or edge. When about 1/4" of the tip has achieved a pale straw color immediately quench into water that should be directly below. If the tip is blue you have gone too far and must reharden, and repeat the tempering procedures. Each of the colors have a meaning: a light gray color means it is the hardest and most brittle; a pale straw color is not too soft or hard, but just right; purplish color means that it is too soft. [8] If your chisel has been correctly tempered, use a paste polish (Happich-Semichrome) on a strip of leather, for the final stropping and polishing.
Put the diffused metals into a pitch block, pitch bowl or large machinists vise. Start to carve through at least three layers using the hatsuri tagane. Remove from the holding device used. Forge out until completely flat. Repeat the sequence of carving and forging one, two or three times more observing the resultant pattern emerging. Continue forging until about 1.5 rem or any desired thickness needed. It is ready to be raised or formed. After the mokume-gane is formed and finished a coloring process using a unique Japanese patina called Rokusho can be used. Rokusho is discussed in Appendix B.
|
|
|
Figure 3
|
Experiments in Diffusion
The decision was made to experiment with the diffusion of select non-ferrous metals utilizing an electric kiln with pyrometer. The premise was to gain heat control and also we wished that others, like ourselves, who am primarily metalsmiths could create mokume-gane with other than a blacksmiths' forge. The preparation of the metals and the placement into the previously described box will be omitted from the test descriptions. The stack of metals contained within the bound steel box are placed and removed from the preheated electric kiln with an enameling fork and a heavy iron wire screen that was bent into an u-shape. Throughout the remainder of this paper when copper is mentioned it is electrolytic tough pitch, alloy no.
Test I
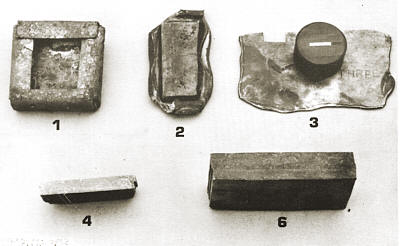
Six layers of copper each being 1.7 ram x 50 mm x 5 men were placed into a preheated (1000 deg. C) electric kiln for 20 minutes and then gradually the heat was brought up to 1050 deg. C. The copper melted and fused to the steel box and steel plate. (Fig. 7-1). The pyrometer was not accurate. Tests were run using ceramic cones to calibrate the pyrometer. (TempilO, Hamilton Blvd., S. Plainfield, N.J., 07080, are producers of temperature indicators, protective coatings & markers; these may also be of use.)
Test 2
Copper of the same number and dimensions as in Test 1 were placed into a preheated (955 deg. C) electric kiln for 10 mins. The copper melted, but not as badly as Test 1. We were begin rung to learn the characteristics of the pyrometer and kiln. The copper fused to the iron cover plate. it was cut in half and forged to see how well the copper and the iron were fused. Fig. 7-2 shows the copper mushrooming out deforming quite radically, but the iron plate remains relatively unaffected and still fused to the copper layers.
|
|
|
Figure 7
|
Test 3
Copper of the same number and dimensions as in Test I were placed in a preheated (625 deg. C) electric kiln and brought up to 920 deg. C (time elapsed from placement into kiln and temperature achieved was 45 mins.). and held for 6-7 mins, gradually increasing the temperatures, observing the stack through the peephold for 4-5 rains. and removed from the kiln when it seemed to be sweating. It was then placed on a hard fire brick and tapped with a wooden hammer. Immediately after tapping the lamination was removed from the box and hot forging commenced; it looked diffused so it was cut in half; one half filed, sanded, polished, etched with ferric chloride to bring out the crystalline structure and photomicrographed (BOX) by Mayer Engel (Fig. 4) describes what has occurred. "Figure 4 shows an area near the edge of a sample where the material of two subsequent layers has oxidized from the air within the furnace. The gap between the two layers begins to break up where grains have actually begun to grow over it, producing a homogeneous structure".
The other half was forged out to 2 mm, a piece 7 men x 15 rem, was cut out from the larger piece cast into plastic; sanded, polished, etched and photomicrographed, (BOX) by Mayer Engel, in approximately the middle of the piece. Figure 5 shows a grain growth where layers had been previously; all except the top most layer where oxidation has occurred in some areas.
Test 4
Copper of the same number and dimensions as Test 1 were placed into a preheated (875 deg. C) electric kiln and held at that temperature for 30 mins. The temperature was brought up to 920 deg. C and held for 5 mins., then increased to 970 deg. C for 2 mins. The corners melted. This piece was cut in half, filed, sanded, polished and etched. The intrusion of oxides could be seen into the center of the mass in some areas. (Fig. 7-4)
Test 5
Four layers of copper each being 1.7 ram x 50 mm x 50 arm were alternately stacked with four layers of shakudo each being 1 rare x 50 ram x 50 mm, with back-up copper 6 mm x 50 ram x 50 men, the total being nine layers. The laminates were placed into a preheated 745 deg. C electric kilnbrought up to 825 deg. C and heat soaked for 15 mins.; after which the temperature was brought up to 875 deg. C and held for 30 mins. and then gradually up to 920 deg. C where meeting was observed. The lamination was removed from the kiln, tapped and hot forged to 8 men. The pattern was started with the hatsuri-tagane; forged again to 6 mm and carved. The forging and carving was repeated 3 more times to a thickness of 1.7 mm x 120 mm x 120 rem and raised (Fig. 6).
Test 6
Eight layers of copper each being 1.7 mm x 75 mm x 75 mm plus a back-up piece of copper 6 mm x 75 mm x 75 mm were placed into a preheated (875 deg. C) electric, kiln and held at that temperature for 30 mins. The temperature was brought up to 945 deg. C, held for 10 mins. gradually increasing the temperature and when sweating was observed removed and lapped. Diffusion had occurred.
Test 7
Four layers of copper each being 1.7 rum x 75 mm x 75 mm were alternately stacked with 5 layers of kuromi-do of the same dimensions with a back-up copper layer 6 mm in thickness, the total being 10 layers. The same procedures were used as in Test 6. Good diffusion. The carving technique being very laborous and time consuming, we decided to search out mechanical aids. The first was a common drill; but it produces a limited, tight pattern. Because of the high angle of its contour and point. After checking out horizontal and vertical mill cutters we located a tool which creates the same low angle cut as the hatsuritagane; the Two Flute Ball Endmill (available from Rutland Tool and Supply, 501 W. Washington Blvd., Montebello, Calif., 90640). Carved and forged three times to a thickness of 1.6 mm x 180 mm x 180 mm and in the process of being raised.
Test 8
Four layers of fine silver I mm x 75 mm x 75 mm were alternately stacked with three layers of copper (1.7 mm) and two layers of kuromi-do (1.7 mm) for a total of nine layers. Fine silver was used because its melting point is closer to the copper and copper alloy used and also for its malleability. Fine silver was placed between each of the other metals. Refer to Part 11, Section 1. The difference in thickness between fine silver and the other metals was because of its availability. The stack was placed into a preheated (800 deg. C) electric kiln for 30 mins. and brought up to 875 deg. C and removed 7 mins. later. The silver melted. Now trying to salvage as much as possible.
Test 9
Same metals and stacking sequence as Test 8. The stack was placed into a preheated (750 deg. C) electric kiln for 30 mins. and brought up to 790 deg. C and removed after 7 mins. The bottom layer of fine silver, between the copper base layer and bottom layer of kuromi-do, started to melt. Fair results. In the process of salvaging as much as possibleFine silver should be of the same thickness as the other metals used.
|
|
|
Figure 8
|
Conclusion
This report is incomplete. Diffusion is technically involved and requires numerous tests. The character of the electric kiln by direct observation of the meeting of metals or diffusion temperatures is the only way of achieving any semblance of success. Copper to copper is recommended as a starting point. Them is room for more research. The hope is that this report will be a point of departure for others to follow. Tests will continue in terms of time and temperature sequences. Recommended time and temperature sequences for copper to copper alloys. Place the stack of metals into a preheated (825 deg. C) electric kiln for 30 mins., bring up to 875 deg. C for 15 mins. and gradually increase temperature to 920 deg. C and observe for sweating; the maximum temperature should not exceed 950 deg. C. Recommended time and temperature sequence for including fine silver into the stack, between every layer of the other metals used. Place the stack of metals into a preheated (750 deg. C) electric kiln for 30 mins., bring up to 790 deg. C and observe for meeting to occur.
Appendix A
Smelting Furnace
An adequate smelting furnace must fulfill the following requirements: a temperature of approximately 2000 degrees F, a quick and uniform heating of the smelting crucible, a controllable furnace atmosphere to minimize slag formation, and a furnace chamber that is accessible to easy placement and removal of the crucible.
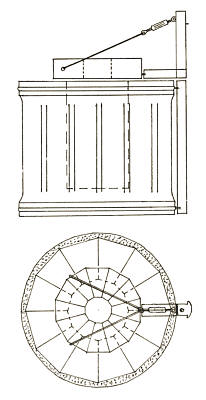
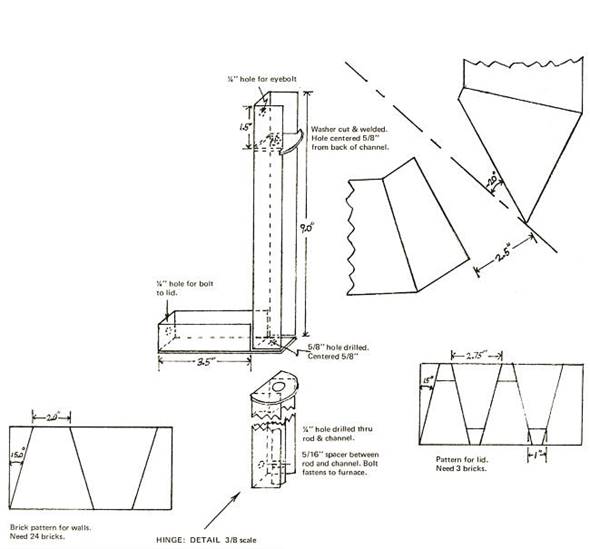
A gas furnace allows for a controllable atmosphere. A circular chamber with the single burner set on a skewed line provides a spiral flame path which surrounds the crucible for uniform heating. A lid with a swivel hinge provides access from the top and acts as the flue. A chamber 10" in height and 8" in diameter allows for a No. 12 crucible which is capable of holding 36 pounds of bronze.
Construction:
The furnace is made of standard K-26 soft firebrick - 4.5"x2.5"x9" cut to form a 12-sided polygon. The bottom of the furnace is a 2.5" layer of brick. The sides are four 2.5" thick rings. Each ring consists of 12 trapezoidal pieces, two of which can be cut from one brick. The whole assemblage is set into a heavy metal container with a minimum inside diameter of 18". A shortened heavy duty garbage can was used in which the bottom was reinforced with a 14 gauge steel disk. The space between the brick and metal wall was filled with vermiculite insulation and tamped firmly to hold the brick in a stable configuration. The burner port is an opening 2.5" x 2.5" in the lowest ring made by cutting short two of the pieces. The port should angle approximately 20 degrees off the radius. The burner used in this case was a natural gas air torch already available in the workshop. Any burner or torch with a 50,000 to 100,000 BTU output can be used and a suitable clamp or bracket made to hold it in place The end of the burner should not extend into the port or else overheating and corrosion of the burner tip might occur.
|
|
Side View
|
|
Top View
|
The lid is made of 12 trapezoidal shaped pieces to make an 11" in diameter polygon with a 4" hole in the center. A 26 gauge steel strap 2.5"x 36" with two hose clamps rivited to the ends, acts as a compression ring to hold all the bricks together. A hole is provided for a 1/4" bolt which fastens the lid and the compression ring to the hinge assemblage.
All exposed brick surfaces should be coated with a super duty refractory cement to protect from brick particles contaminating the melt.
The hinge is two constructions; a steel rod fastened to the steel jacket with a "stop" even with the top of the furnace, and an assembly which fastens to the lid compression ring. The lid and hinge assembly slip onto the rod which extends above the top of the furnace. A turnbuckle is fastened to the top of the lid hinge and a cable run from it to two points of the lid compression ring. This provides a 3 point support and allows for adjustments of the lid to keep it clear of the furnace top. Additional washers are used as spacers between the lower and upper hinge. It is important that the steel jacket be strong enough to support the hinge.
There is quite a bit of leeway in the burner positioning The flame should hit the furnace wall, not the crucible. A good spiraling flame can be seen from above.
Appendix B
Coloring
In Japan a commercially available patina called rokusho is used. It is impossible to import into this country on a commercial basis because of the nature of its ingredients which are considered to be poisonous. Rokusho is an etchant and creates different oxidizes on the surface of the metals laminated in the process of mokume-gane. Refer to chart in Part 1 for colors achieved with rokusho. Rokusho has been analyzed to contain:
 copper acetate Cu (CH3C00)2.H2O - 30 grams
calcium carbonate CaC03 - 10 grams
sodium hydroxide NaOH - 10 grams
The above is dissolved into 750 ml of water (filtered or distilled) and then it is left to stand for a week or more. The container should be glass, plastic or copper. Drain the top water. This is rokusho! To a copper or pyrex container add the rokuSho with 4.5 liters of distilled or filtered water and 20 grams of copper sulphate. Bring to a boil. Grind, long, white raddish known as daikon and add 5 parts of water. Place a large container of water near the solution of rokusho. Remove all fire scale before the piece is to be colored. Boil the piece (if buffed) in water to remove the surface grease and oils. Clean in a strong pickle solution or in a solution of 5 grams of potassium cyanide with 1.8 liters of water.
1. Cover the object with the raddish solution and dip into the boiling rokusho keeping the piece constantly moving for ten minutes. Remove from the solution and immediately immerse in the nearby container of water, to avoid water spotting or from particles of rokusho drying on the surface of the piece.
2. Repeat step one several times until the coloration is achieved. It usually takes 30 minutes to one hour. Copper should turn reddish brown, shakudo a bluish black and kuromi-do a dark brown and any silver surfaces should remain uncolored.
Another solution: copper acetate - 3 dwt; copper sulphate - 2 dwt; water 1 liter. The above is dissolved and brought to boiling. The procedure is the same as the above. Degrease your hands and wash the object in ammonia and detergent soap solution of equal parts. This solution is not as satisfactory in achieving a reddish brown on copper, but will color shakudo and kuromido. After using either of the two above solutions to achieve coloration on an object of mixed metals, apply a coat of bees-wax or any wax that contains no cleaners, by warming the piece on a hot plate, wiping off any excess wax and polishing with a clean, lint free cloth.